<?xml version="1.0" encoding="utf-8"?>
<feed xmlns="http://www.w3.org/2005/Atom">

  <title><![CDATA[Tag: teracy-dev | Teracy's Blog]]></title>
  <link href="http://blog.teracy.com/tags/teracy-dev/atom.xml" rel="self"/>
  <link href="http://blog.teracy.com/"/>
  <updated>2017-10-19T04:12:43+00:00</updated>
  <id>http://blog.teracy.com/</id>
  <author>
    <name><![CDATA[Teracy]]></name>
    
  </author>
  <generator uri="http://octopress.org/">Octopress</generator>

  
  <entry>
    <title type="html"><![CDATA[How to use Docker in Docker (DinD) and Docker outside of Docker (DooD) for local CI testing]]></title>
    <link href="http://blog.teracy.com/2017/09/11/how-to-use-docker-in-docker-dind-and-docker-outside-of-docker-dood-for-local-ci-testing/"/>
    <updated>2017-09-11T08:10:00+00:00</updated>
    <id>http://blog.teracy.com/2017/09/11/how-to-use-docker-in-docker-dind-and-docker-outside-of-docker-dood-for-local-ci-testing</id>
    <content type="html"><![CDATA[<p><img class="center" src="/images/2017/09/11/spintop-dind.jpg" title="Docker in Docker" >
Credit: <a href="https://github.com/jpetazzo/dind">https://github.com/jpetazzo/dind</a></p>

<p>Although running Docker inside Docker (DinD) or Docker outside of Docker (DooD) is generally not
recommended, there are some legitimate use cases, such as development of Docker itself or for local
CI testing. And in this blog post, I&rsquo;m going to show you how to use DinD or DooD for local CI testing
as it&rsquo;s a very typical use case for local DevOps.</p>

<!-- more -->


<h2>The differences between DinD and DooD?</h2>

<p>DinD is the opposite of DooD.</p>

<p>DinD includes a whole Docker installation inside of it.</p>

<p>DooD uses its underlying host&rsquo;s Docker installation by bind-mounting the Docker socket.</p>

<p>Obviously, DooD should be faster because we can leverage its caching mechanism, and DinD should be
cleaner. DinD should support parallel running but DooD does not, or at least, not very reliable
with my observation. If you want to conduct the clean testing, use DinD. If you want to conduct the
faster testing, use DooD.</p>

<p>DooD is simpler to use than DinD.</p>

<p>And if you want to test with different versions of <code>docker</code>, <code>docker-compose</code>, use DinD and DooD.</p>

<h2>Local CI testing with DinD</h2>

<p>You can use <a href="https://hub.docker.com/r/library/docker/">https://hub.docker.com/r/library/docker/</a> for local testing, however, it&rsquo;s <code>alpine</code> image
which is not very suitable for local CI testing since it is not the default travis-ci environment.
We should use Ubuntu for executing CI scripts on all the CI systems (gitlab, drone, etc.) because we
can port the CI scripts easily between these CI systems.</p>

<p>That is the reason why we build <code>teracy/ubuntu</code> Docker images to be used with DinD, you can check out
the project here: <a href="https://github.com/teracyhq/docker-files/tree/master/ubuntu">https://github.com/teracyhq/docker-files/tree/master/ubuntu</a> and the built Docker
images here: <a href="https://hub.docker.com/r/teracy/ubuntu/tags/">https://hub.docker.com/r/teracy/ubuntu/tags/</a></p>

<p>We also have <code>docker-compose</code> installed to the <code>teracy/ubuntu</code> Docker images for faster testing
with it.</p>

<p>Let&rsquo;s see how it works:</p>

<script type="text/javascript" src="https://asciinema.org/a/137135.js" id="asciicast-137135" async></script>


<p>The commands from the above video:</p>

<p>```bash
$ docker run &mdash;privileged &mdash;name df-docker -d docker:17.06.0-dind # start DinD container</p>

<p>$ docker run &mdash;rm -it &mdash;link df-docker:docker docker:17.06.0 sh # run docker image (Alpine)</p>

<h1>docker version</h1>

<h1>docker-compose &mdash;version # no docker-compose</h1>

<p>$ docker run &mdash;rm -it ubuntu bash # run Ubuntu image within the Docker Alpine container</p>

<h1>uname -a</h1>

<h1>exit</h1>

<h1>uname -a</h1>

<h1>exit</h1>

<p>$ docker run &mdash;rm -it &mdash;link df-docker:docker teracy/ubuntu:16.04-dind-17.06.0-ce bash # run Ubuntu image</p>

<h1>docker version</h1>

<h1>docker-compose version</h1>

<p>$ docker run &mdash;rm -it alpine sh # run Alpine image with the Docker Ubuntu container</p>

<h1>uname -a</h1>

<h1>exit</h1>

<h1>uname -a</h1>

<h1>exit</h1>

<p>```</p>

<h2>Local CI testing with DooD</h2>

<p>Let&rsquo;s see how it works:</p>

<script type="text/javascript" src="https://asciinema.org/a/137139.js" id="asciicast-137139" async></script>


<p>The commands from the above video:</p>

<p>```
$ docker run &mdash;rm -it -v /var/run/docker.sock:/var/run/docker.sock docker sh # start DooD container</p>

<h1>docker version</h1>

<h1>docker-compose &mdash;version # no docker-compose</h1>

<p>$ docker run &mdash;rm -it ubuntu bash # run Ubuntu image within the Docker Alpine container</p>

<h1>cat /etc/lsb-release</h1>

<h1>exit</h1>

<h1>cat /etc/alpine-release</h1>

<h1>exit</h1>

<p>$ docker run &mdash;rm -it -v /var/run/docker.sock:/var/run/docker.sock teracy/ubuntu:16.04-dind-17.06.0-ce bash # start DooD container</p>

<h1>docker version</h1>

<h1>docker-compose version</h1>

<h1>docker run &mdash;rm -it alpine sh # run Alpine image with the Docker Ubuntu container</h1>

<h1>cat /etc/alpine-release</h1>

<h1>exit</h1>

<h1>cat /etc/lsb-release</h1>

<h1>exit</h1>

<p>```</p>

<h2>Volume mounting</h2>

<p>Volume mounting is a bit tricky, you must understand the underlying mechanism of its to get it work.
Basically, you need to make sure the mounting path from the running containers must be the same as the
DinD containers or DooD containers.</p>

<p>Let&rsquo;s see how volume mounting works with DinD:</p>

<script type="text/javascript" src="https://asciinema.org/a/137150.js" id="asciicast-137150" async></script>


<p>The commands from the above video:</p>

<p>```bash</p>

<h1>volume mount with DinD</h1>

<p>$ pwd
$ ls
$ docker run &mdash;privileged &mdash;name df-docker -d -v $(pwd):$(pwd) -w $(pwd) docker:17.06.0-dind # start DinD container
$ docker run &mdash;rm -it &mdash;link df-docker:docker -v $(pwd):$(pwd) -w $(pwd) teracy/ubuntu:16.04-dind-17.06.0-ce bash</p>

<h1>ls</h1>

<h1>docker run &mdash;rm -it -v $(pwd):/opt/app -w /opt/app ubuntu bash</h1>

<h1>ls</h1>

<p>```</p>

<p>Let&rsquo;s see how volume mounting works with DooD:</p>

<script type="text/javascript" src="https://asciinema.org/a/137152.js" id="asciicast-137152" async></script>


<p>The commands from the above video:</p>

<p>```bash</p>

<h1>volume mount with DooD</h1>

<p>$ pwd
$ ls
$ docker run &mdash;rm -it -v /var/run/docker.sock:/var/run/docker.sock -v $(pwd):/$(pwd) -w $(pwd) teracy/ubuntu:16.04-dind-17.06.0-ce bash # start DooD container</p>

<h1>ls</h1>

<h1>docker run &mdash;rm -it -v $(pwd):/opt/app -w /opt/app ubuntu bash</h1>

<h1>ls</h1>

<p>```</p>

<h2>Local CI Testing with a real project</h2>

<p>Let&rsquo;s see how we can conduct a local CI testing with the <a href="https://github.com/teracyhq/docker-files">https://github.com/teracyhq/docker-files</a> project.</p>

<p>Let&rsquo;s dive into the .travis.yml file <a href="https://github.com/teracyhq/docker-files/blob/master/.travis.yml">https://github.com/teracyhq/docker-files/blob/master/.travis.yml</a>
to test the following scripts:</p>

<p>```yml
before_install:</p>

<h1>install the latest docker and docker-compose versions</h1>

<ul>
<li>sudo apt-get remove docker docker-engine</li>
<li>sudo curl -sSL <a href="https://get.docker.com/">https://get.docker.com/</a> | sh</li>
<li>sudo rm /usr/local/bin/docker-compose

<h1>the latest docker-compose version</h1></li>
<li>export DOCKER_COMPOSE_VERSION=$(curl -s <a href="https://api.github.com/repos/docker/compose/releases/latest">https://api.github.com/repos/docker/compose/releases/latest</a> | grep &lsquo;tag_name&rsquo; | cut -d\&ldquo; -f4)</li>
<li>curl -L <a href="https://github.com/docker/compose/releases/download/$">https://github.com/docker/compose/releases/download/$</a>{DOCKER_COMPOSE_VERSION}/docker-compose-<code>uname -s</code>&ndash;<code>uname -m</code> > docker-compose</li>
<li>chmod +x docker-compose</li>
<li>sudo mv docker-compose /usr/local/bin</li>
<li>docker version</li>
<li>docker-compose version
```</li>
</ul>


<p>Let&rsquo;s see how to do local CI testing in action:</p>

<script type="text/javascript" src="https://asciinema.org/a/137314.js" id="asciicast-137314" async></script>


<p>This is just the very first step for basic testing.</p>

<p>Later, we should convert this <code>.travis.yml</code> file into a <code>build.sh</code> one to execute, this is the right way
for local CI testing travis-ci and other similar CI systems.</p>

<p>To do that, please follow <a href="https://github.com/teracyhq/docker-files/issues/42">https://github.com/teracyhq/docker-files/issues/42</a> and I&rsquo;ll update this
section more when it&rsquo;s ready.</p>

<h2>Too many virtualization layers?</h2>

<p>At Teracy, the <code>teracy-dev</code> VM is virtualized on a host machine (and the host machine could be virtualized
from another virtualized machine and so on).</p>

<p>Within the <code>teracy-dev</code> VM, we use DinD. And within a Docker container, we can use Docker to run other
Docker containers and so on.</p>

<p>Yeah, welcome to the world of &ldquo;Inception&rdquo;, let&rsquo;s figure out where you are now :&ndash;)?</p>

<p>Happy hacking!</p>

<h2>References</h2>

<ul>
<li><a href="http://jpetazzo.github.io/2015/09/03/do-not-use-docker-in-docker-for-ci/">http://jpetazzo.github.io/2015/09/03/do-not-use-docker-in-docker-for-ci/</a></li>
<li><a href="https://hub.docker.com/r/library/docker/">https://hub.docker.com/r/library/docker/</a></li>
<li><a href="https://github.com/axltxl/docker-jenkins-dood">https://github.com/axltxl/docker-jenkins-dood</a></li>
<li><a href="https://sreeninet.wordpress.com/2016/12/23/docker-in-docker-and-play-with-docker/">https://sreeninet.wordpress.com/2016/12/23/docker-in-docker-and-play-with-docker/</a></li>
</ul>

]]></content>
  </entry>
  
  <entry>
    <title type="html"><![CDATA[teracy-dev v0.5.0-c1 release]]></title>
    <link href="http://blog.teracy.com/2017/07/27/teracy-dev-v0-5-0-c1-release/"/>
    <updated>2017-07-27T03:41:00+00:00</updated>
    <id>http://blog.teracy.com/2017/07/27/teracy-dev-v0-5-0-c1-release</id>
    <content type="html"><![CDATA[<p>We’re very happy to announce the release of teracy-dev v0.5.0-c1. This version introduces lots of features and changes which support more development, deployment stack along with Docker and Kubernetes.</p>

<h2>v0.5.0-c1</h2>

<p>As you&rsquo;ve known, the RC-1 version means “all minor bugs are fixed, the software works stably, and the code will be released unless there is a last minute bug found after test campaigns.”. However, to meet some requests from our clients and community, we added some features to this release.</p>

<!-- more -->


<h2>Changes</h2>

<p>This major release includes some bugs fixed, document improvement and new features:</p>

<ul>
<li>Support the project base configuration. From now, you can add a list of vagrant configuration to your JSON file and extend the configuration from that.</li>
<li>Update the document for the getting started with windows environment, nodejs debugging.</li>
<li>Add many tools to help your development process.</li>
<li>Add the ability to extend and uniquely extend the array list in the JSON configuration file.</li>
<li>Introduce ACME101 as the sample project which shows the best practices of using teracy-dev.</li>
</ul>


<p>There are more that you should explore yourselves when using <code>teracy-dev</code> for a while.</p>

<h2>What&rsquo;s next?</h2>

<p>Along with the project base configuration we also introduce <a href="https://github.com/acme101">ACME101</a> which has many development stacks to use with teracy-dev. Hopefully, it will be useful for you and we&rsquo;re welcome any contribution, suggestion for ACME101. We&rsquo;re also adding more documents and guide for the project.</p>

<p>We&rsquo;ll take all the feedbacks from v0.5.0 usage to continue making <code>teracy-dev</code> better and greater.</p>

<p>Don&rsquo;t hesitate to use <a href="https://github.com/teracyhq/dev">teracy-dev v0.5.0-c1</a> for your everyday
projects from today by getting started with <a href="http://dev.teracy.org/docs/getting_started.html">http://dev.teracy.org/docs/getting_started.html</a></p>

<p>If you have any feedbacks or problems, you&rsquo;re welcome to create issues for the project at
<a href="https://github.com/teracyhq/dev/issues">https://github.com/teracyhq/dev/issues</a></p>

<p>Enjoy and happy hacking!</p>
]]></content>
  </entry>
  
  <entry>
    <title type="html"><![CDATA[How to extend teracy-dev to work with Kubernetes]]></title>
    <link href="http://blog.teracy.com/2017/06/15/how-to-extend-teracy-dev-to-work-with-kubernetes/"/>
    <updated>2017-06-15T11:05:00+00:00</updated>
    <id>http://blog.teracy.com/2017/06/15/how-to-extend-teracy-dev-to-work-with-kubernetes</id>
    <content type="html"><![CDATA[<p><img class="center" src="/images/2017/06/15/kubernetes_logo_with_border.png" title="Kubernetes Logo" >
<em>Credit: Kubernetes</em></p>

<p><code>teracy-dev</code> is developed with the goal to keep it as minimal and extensible as possible.
The extension feature is so powerful that you can customize the VM in anyway you want. For example,
in this blog post, I&rsquo;ll show you how to extend it to work with Kubernetes.</p>

<!-- more -->


<h2>About Kubernetes</h2>

<p>We&rsquo;re leveraging Docker for all of our development workflow for our clients, internal and open
source projects. <code>teracy-dev</code> is provisioned with Docker by default out of the box so that we can
start working with Docker right away.</p>

<p>However, Docker alone is not enough to work with container technology stack. The production deployment
is different from the local Docker environment. There are many options for container production deployment,
however, we choose Kubernetes as the first class as it&rsquo;s currently the big giant and the future of
container orchestration that we believe in.</p>

<p>Working with Kubernetes requires <code>kubectl</code> client to be available, and if you&rsquo;re starting to use
GKE (Google Container Engine), <code>gcloud</code> (google cloud sdk) client should be available, too.</p>

<p>So let&rsquo;s find a way to extend <code>teracy-dev</code> to install <code>kubectl</code> and <code>gcloud</code>.</p>

<h2>Extending <code>teracy-dev</code></h2>

<p>You can extend <code>teracy-dev</code>&rsquo;s VM by your own choice of operating system and automate the provisioning
process by your own choice of configuration software. &ldquo;The only limit is your imagination&rdquo; :&ndash;).</p>

<p>To extend <code>teracy-dev</code>, we can use any kind of provisioners that are supported by vagrant (as <code>teracy-dev</code>
is built on top of <code>vagrant</code>), you can see more info here: <a href="https://www.vagrantup.com/docs/provisioning/">https://www.vagrantup.com/docs/provisioning/</a></p>

<p>We choose <code>Chef</code> as it&rsquo;s our default provisioner that we have more years of usage experience. We intend
to use <code>Ansible</code> for some future projects, too.</p>

<h2>Installing <code>ChefDK</code></h2>

<p>We&rsquo;re going to use <code>Acme 101</code> project which is used to show the best practices from <code>teracy-dev</code> applied
for organizations.</p>

<p>To work with Chef cookbooks, we need to install <code>ChefDK</code>. Fortunately, there is already an available cookbook
for us to use to install <code>ChefDK</code> automatically on our VM: <a href="https://supermarket.chef.io/cookbooks/chef-dk">https://supermarket.chef.io/cookbooks/chef-dk</a></p>

<p>Usually, we have <code>dev-setup</code> directory to extend <code>teracy-dev</code> (<code>acme-dev</code> in this case). The initial
<code>dev-setup</code> content should be like this: <a href="https://github.com/acme101/kubernetes-dev-setup/tree/0-initial">https://github.com/acme101/kubernetes-dev-setup/tree/0-initial</a></p>

<p>To install <code>ChefDK</code>, we must install the <code>chef-dk</code> cookbook and use it as follows:</p>

<ul>
<li><p>Add <code>depends 'chef-dk'</code> to <code>dev-setup/chef/main-cookbooks/acme/metadata.rb</code></p></li>
<li><p>Install vendor cookbooks with the following commands within the VM:</p></li>
</ul>


<p><code>
$ ws
$ cd dev-setup/chef
$ docker-compose up
</code></p>

<ul>
<li>Sync back the changes from the VM to the host machine:</li>
</ul>


<p><code>
$ vagrant rsync-back
</code></p>

<p>The updated content should be like this: <a href="https://github.com/acme101/kubernetes-dev-setup/tree/1-dependency">https://github.com/acme101/kubernetes-dev-setup/tree/1-dependency</a></p>

<p>Now, to install <code>chef-dk</code>, just add the following Ruby code to <code>default.rb</code> recipe, it&rsquo;s never so easy:</p>

<p><code>
chef_dk 'my_chef_dk' do
  global_shell_init true
  action :install
end
</code></p>

<p>Make sure you have <code>berks-cookbooks</code> paths that <code>vagrant</code> can look up. The configuration step should
be like this: <a href="https://github.com/acme101/kubernetes-dev-setup/tree/2-configuration">https://github.com/acme101/kubernetes-dev-setup/tree/2-configuration</a></p>

<ul>
<li>After that, <code>$ vagrant reload --provision</code> and voila, you should have <code>ChefDk</code> installed.</li>
</ul>


<p><code>
$ vagrant ssh
$ chef --version
Chef Development Kit Version: 1.4.3
chef-client version: 12.19.36
delivery version: master (41b94ffb5efd33723cf72a89bf4d273c8151c9dc)
berks version: 5.6.4
kitchen version: 1.16.0
inspec version: 1.25.1
</code></p>

<p>That&rsquo;s how we use Chef cookbooks to manage the VM&rsquo;s software automatically. We can do the same with
all other types of Chef cookbooks shared and opensourced from the public Chef Supermarket: <a href="https://supermarket.chef.io/">https://supermarket.chef.io/</a>
You can use all the public shared cookbooks to do almost anything you want for your VM.</p>

<p>However, sometimes, there is not available cookbook that we want, then it&rsquo;s time we should
build new cookbooks from scratch.</p>

<h2>Creating new Chef cookbooks</h2>

<p>From the steps above, we have <code>ChefDK</code> available to work with Chef cookbooks. To learn how to use it,
you can follow: <a href="https://github.com/chef/chef-dk">https://github.com/chef/chef-dk</a></p>

<p>I already created the initial <code>kubernetes-stack-cookbook</code> that we can work with. You need to clone
the repo into the <code>workspace</code> directory:</p>

<p><code>
$ cd ~/acme-dev/workspace
$ git clone git@github.com:teracyhq-incubator/kubernetes-stack-cookbook.git
</code></p>

<p>You can test the cookbook within the VM (<code>$ vagrant ssh</code>) with <code>rspec</code>, <code>kitchen</code> easily:</p>

<p><code>
$ ws
$ cd kubernetes-stack-cookbook/
$ rspec
</code></p>

<p>you should see the following similar content:</p>

<p>```
kubernetes-stack::default
  When all attributes are default, on ubuntu 16.04</p>

<pre><code>converges successfully
</code></pre>

<p>kubernetes-stack-test::gcloud_install_default
  When all attributes are default, on ubuntu 16.04</p>

<pre><code>converges successfully
install gcloud
</code></pre>

<p>kubernetes-stack-test::kubectl_install_default
  When all attributes are default, on ubuntu 16.04</p>

<pre><code>converges successfully
install kubectl
</code></pre>

<p>Finished in 1.35 seconds (files took 1.78 seconds to load)
5 examples, 0 failures</p>

<p>ChefSpec Coverage report generated&hellip;</p>

<p>  Total Resources:   7
  Touched Resources: 2
  Touch Coverage:    28.57%</p>

<p>Untouched Resources:</p>

<p>  gcloud[install default gcloud]     kubernetes-stack-test/recipes/gcloud_install_default.rb:1
  execute[import google-cloud-sdk public key]   kubernetes-stack/resources/gcloud.rb:13
  apt_repository[google-cloud-sdk]   kubernetes-stack/resources/gcloud.rb:17
  bash[clean up the mismatched kubectl version]   kubernetes-stack/resources/kubectl.rb:20
  remote_file[/usr/local/bin/kubectl]   kubernetes-stack/resources/kubectl.rb:33
```</p>

<p>and to test with <code>kitchen</code>:</p>

<p><code>
$ ws
$ cd kubernetes-stack-cookbook/
$ export KITCHEN_LOCAL_YAML=.kitchen.dokken.yml
$ kitchen test
</code></p>

<p>then you should see the following similar content:</p>

<p>```
&hellip;
Starting Chef Client, version 13.2.7
[2017-06-14T17:53:24+00:00] WARN: Plugin Network: unable to detect ipaddress
resolving cookbooks for run list: [&ldquo;kubernetes-stack-test::gcloud_install_default&rdquo;]
Synchronizing Cookbooks:
  &ndash; kubernetes-stack-test (0.1.0)
  &ndash; kubernetes-stack (0.1.0)
Installing Cookbook Gems:
Compiling Cookbooks&hellip;
Converging 1 resources
Recipe: kubernetes-stack-test::gcloud_install_default
  * gcloud[install default gcloud] action install</p>

<pre><code>* execute[import google-cloud-sdk public key] action run
  - execute curl https://packages.cloud.google.com/apt/doc/apt-key.gpg | apt-key add -
* apt_repository[google-cloud-sdk] action add
  * execute[apt-cache gencaches] action nothing (skipped due to action :nothing)
  * apt_update[google-cloud-sdk] action nothing (skipped due to action :nothing)
  * file[/etc/apt/sources.list.d/google-cloud-sdk.list] action create
    - create new file /etc/apt/sources.list.d/google-cloud-sdk.list
    - update content in file /etc/apt/sources.list.d/google-cloud-sdk.list from none to 24ee22
    --- /etc/apt/sources.list.d/google-cloud-sdk.list 2017-06-14 17:53:25.296105380 +0000
    +++ /etc/apt/sources.list.d/.chef-google-cloud-sdk20170614-20-7wqkmu.list 2017-06-14 17:53:25.296105380 +0000
    @@ -1 +1,2 @@
    +deb      "http://packages.cloud.google.com/apt" cloud-sdk-xenial main
    - change mode from '' to '0644'
    - change owner from '' to 'root'
    - change group from '' to 'root'
  * execute[apt-cache gencaches] action run
    - execute apt-cache gencaches
  * apt_update[google-cloud-sdk] action update
    - force update new lists of packages
    * directory[/var/lib/apt/periodic] action create (up to date)
    * directory[/etc/apt/apt.conf.d] action create (up to date)
    * file[/etc/apt/apt.conf.d/15update-stamp] action create_if_missing
      - create new file /etc/apt/apt.conf.d/15update-stamp
      - update content in file /etc/apt/apt.conf.d/15update-stamp from none to 174cdb
      --- /etc/apt/apt.conf.d/15update-stamp  2017-06-14 17:53:26.136525380 +0000
      +++ /etc/apt/apt.conf.d/.chef-15update-stamp20170614-20-1r28edv 2017-06-14 17:53:26.136525380 +0000
      @@ -1 +1,2 @@
      +APT::Update::Post-Invoke-Success {"touch /var/lib/apt/periodic/update-success-stamp 2&gt;/dev/null || true";};
    * execute[apt-get -q update] action run
      - execute apt-get -q update


* apt_package[google-cloud-sdk] action install

  - install version 159.0.0-0 of package google-cloud-sdk
</code></pre>

<p>Running handlers:
Running handlers complete
Chef Client finished, 9/13 resources updated in 55 seconds</p>

<pre><code>   Finished converging &lt;smoke-gcloud-ubuntu-1604&gt; (1m0.97s).
</code></pre>

<p>&mdash;&mdash;&ndash;> Setting up &lt;smoke-gcloud-ubuntu-1604>&hellip;</p>

<pre><code>   Finished setting up &lt;smoke-gcloud-ubuntu-1604&gt; (0m0.00s).
</code></pre>

<p>&mdash;&mdash;&ndash;> Verifying &lt;smoke-gcloud-ubuntu-1604>&hellip;</p>

<pre><code>   Loaded tests from test/smoke/gcloud 
</code></pre>

<p>Profile: tests from test/smoke/gcloud
Version: (not specified)
Target:  docker://16562c9afb7c00447169330fc584b442617a810f6b776d2eb6b78ce87d5d652f</p>

<p>  Command which</p>

<pre><code> ✔  gcloud exit_status should eq 0
 ✔  gcloud stdout should match "/usr/bin/gcloud"
</code></pre>

<p>Test Summary: 2 successful, 0 failures, 0 skipped</p>

<pre><code>   Finished verifying &lt;smoke-gcloud-ubuntu-1604&gt; (0m0.64s).
</code></pre>

<p>&mdash;&mdash;&ndash;> Destroying &lt;smoke-gcloud-ubuntu-1604>&hellip;</p>

<pre><code>   Deleting kitchen sandbox at /home/vagrant/.dokken/kitchen_sandbox/1000b8c847-smoke-gcloud-ubuntu-1604
   Deleting verifier sandbox at /home/vagrant/.dokken/verifier_sandbox/1000b8c847-smoke-gcloud-ubuntu-1604
   Finished destroying &lt;smoke-gcloud-ubuntu-1604&gt; (0m10.67s).
   Finished testing &lt;smoke-gcloud-ubuntu-1604&gt; (1m55.61s).
</code></pre>

<p>&mdash;&mdash;&ndash;> Kitchen is finished. (4m12.76s)
```</p>

<p>That&rsquo;s how we develop and test the cookbook on local dev.</p>

<p>You can see the cookbook here at <a href="https://github.com/teracyhq-incubator/kubernetes-stack-cookbook">https://github.com/teracyhq-incubator/kubernetes-stack-cookbook</a></p>

<p>It&rsquo;s currently a very simple cookbook to support the installation of <code>kubectl</code> and <code>gcloud</code>. In
the future, it will do more than that and support more platforms than current Ubuntu only.</p>

<h2>Installing <code>kubectl</code> and <code>gcloud</code></h2>

<p>The <code>kubernetes-stack-cookbook</code> is not available on the Chef Supermarket (yet), so to use it, we need
to install it from the github repo.</p>

<p>To install <code>kubectl</code>, add this to the <code>default.rb</code> recipe:</p>

<p><code>
kubectl 'install the latest kubectl'
</code></p>

<p>To install <code>gcloud</code>, add this to the <code>default.rb</code> recipe:</p>

<p><code>
gcloud 'install the latest gcloud'
</code></p>

<p>The configuration step should be like this: <a href="https://github.com/acme101/kubernetes-dev-setup/tree/3-kubectl-gcloud-installation">https://github.com/acme101/kubernetes-dev-setup/tree/3-kubectl-gcloud-installation</a></p>

<p>After that, <code>$ vagrant reload --provision</code> and voila (again), you should have both of the packages installed.</p>

<p><code>
$ kubectl version
Client Version: version.Info{Major:"1", Minor:"6", GitVersion:"v1.6.4", GitCommit:"d6f433224538d4f9ca2f7ae19b252e6fcb66a3ae", GitTreeState:"clean", BuildDate:"2017-05-19T18:44:27Z", GoVersion:"go1.7.5", Compiler:"gc", Platform:"linux/amd64"}
The connection to the server localhost:8080 was refused - did you specify the right host or port?
</code></p>

<p><code>
vagrant@acme:~$ gcloud --version
Google Cloud SDK 159.0.0
alpha 2017.06.09
beta 2017.06.09
bq 2.0.24
core 2017.06.09
gcloud
gsutil 4.26
</code></p>

<h2>Setting up Kubernetes local deployment</h2>

<p>I&rsquo;ve shown you how to extend <code>teracy-dev</code> to install new software packages. It is very simple, just follow
the steps I described above to apply for all other projects.</p>

<p><code>kubectl</code> and <code>gcloud</code> are used to work with Google Container Engine (GKE), however, we want
to install Kubernetes to test on local dev, too. So I will have another blog post to cover this more
complex setup: how to create a Kubernetes cluster to work on local dev so that we can test all your
production Docker images on your local dev the same way it is deployed on the production system.</p>

<h2>Summary</h2>

<p>Now you should know how to extend <code>teracy-dev</code> with Chef cookbooks, this is a very common task to do.
And other newcomer devs can just use your <code>dev-setup</code> without learning anything new, just follow
the instructions and learn more to master later.</p>

<p>There are still some areas of configuration for <code>teracy-dev</code> that needs improvement and it will be
available on <code>teracy-dev</code> v0.5.0, so stay tuned for our next very exciting upcoming releases.</p>

<p>I hope that this blog post can help you follow the current best practices to extend <code>teracy-dev</code>
for your own need more easily. If you have any problem with it, let me know by dropping your comments.</p>

<p>Happy hacking!</p>
]]></content>
  </entry>
  
  <entry>
    <title type="html"><![CDATA[How to develop Angular 2+ applications easily with Docker, angular-cli and angular-boilerplate]]></title>
    <link href="http://blog.teracy.com/2017/03/22/how-to-develop-angular-2-applications-easily-with-docker-angular-cli-and-angular-boilerplate/"/>
    <updated>2017-03-22T18:16:00+00:00</updated>
    <id>http://blog.teracy.com/2017/03/22/how-to-develop-angular-2-applications-easily-with-docker-angular-cli-and-angular-boilerplate</id>
    <content type="html"><![CDATA[<p><img class="center" src="/images/2017/03/22/acme101-angular-hello-world.gif" title="Acme 101 angular-hello-world" ></p>

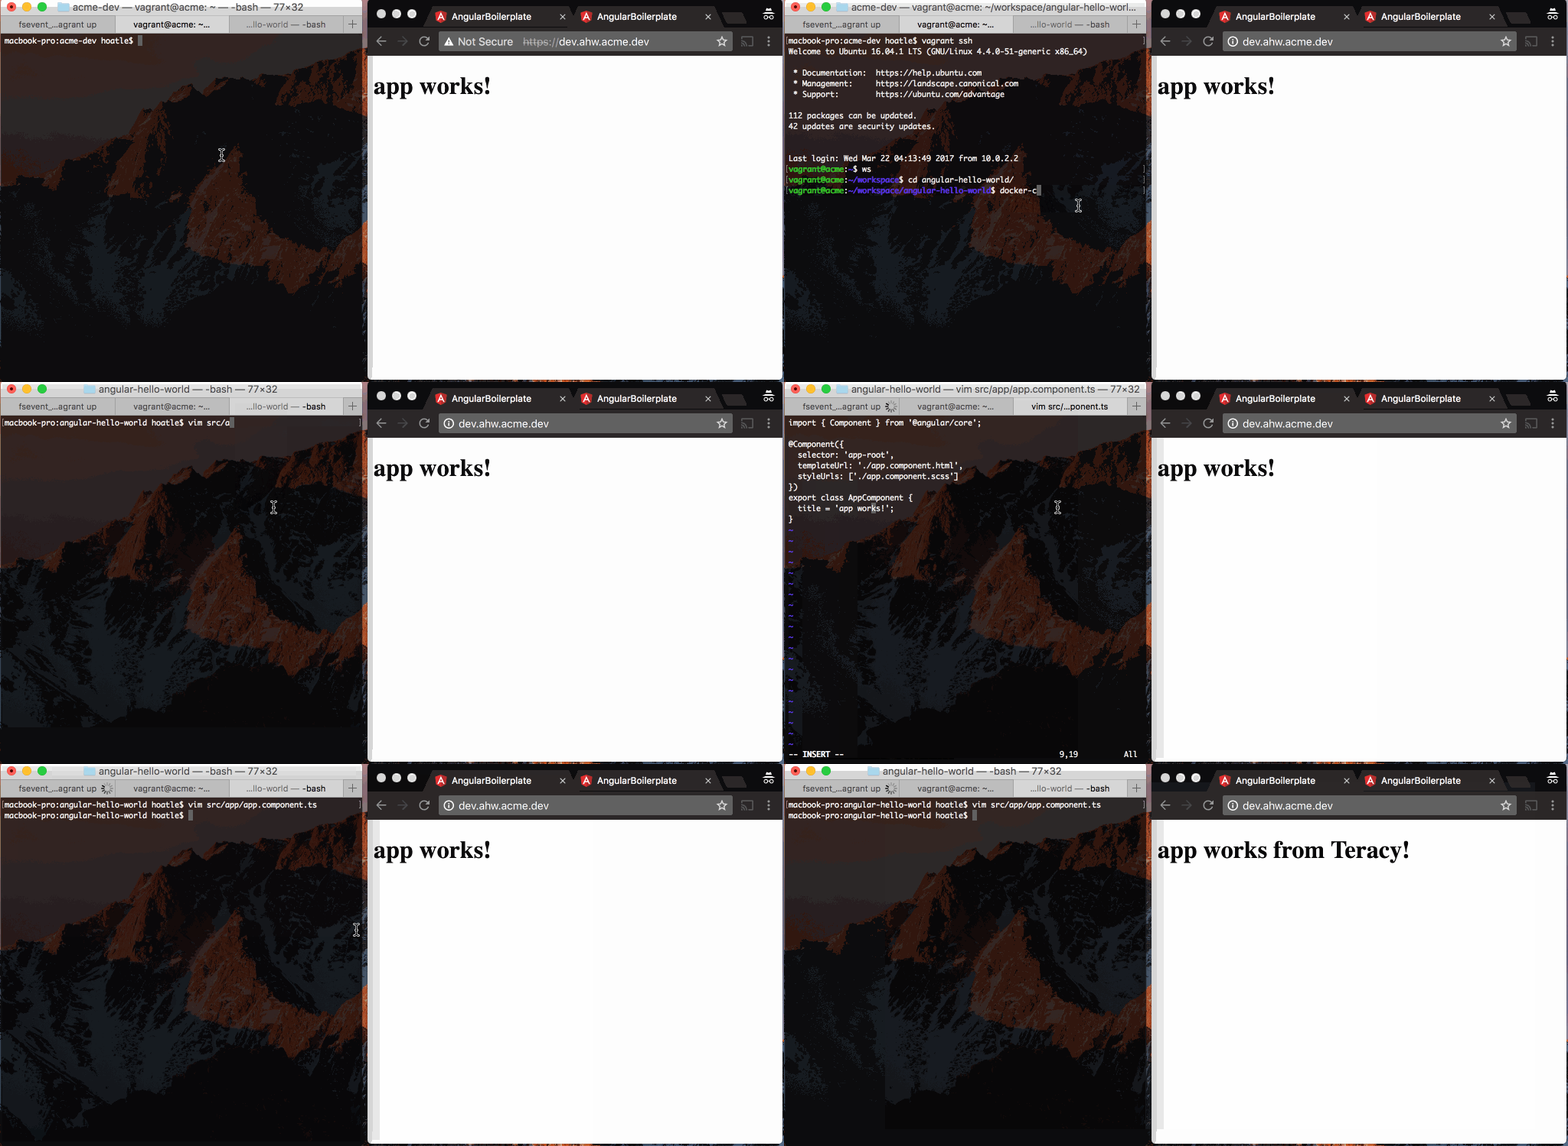
<p>About six months ago we published
<a href="/2016/09/22/how-to-develop-angular-2-applications-easily-with-docker-and-angular-cli/">How to Develop Angular 2 Applications Easily With Docker and Angular-cli</a> which received a lot of
Angular community feedbacks and questions.</p>

<p>Six months has passed and we&rsquo;d like to share more best practices to develop Angular applications with
Docker after working on it for a while.</p>

<!-- more -->


<h2>Received Feedbacks</h2>

<p>We received some outstanding feedbacks and questions about:</p>

<ul>
<li>Problems when running Docker images after pulling the built Docker images.</li>
<li>How to build prod Docker image and run it.</li>
<li>How to get <code>npm</code> packages into the <code>node_modules</code> to work within your IDE, editor.</li>
</ul>


<p>And in this blog post, we&rsquo;re going to solve all of them and even with more best practices.</p>

<h2>angular-boilerplate</h2>

<p>Setting up Angular projects with Docker to get it work properly is not easy. Luckily, we&rsquo;ve done
all the heavy lifting for you with the <code>angular-boilerplate</code> project.</p>

<p><code>angular-boilerplate</code> was created as a seed project that can be used to generate any new Angular
projects having Docker and CI/CD system support.</p>

<p>To generate a new Angular project, you can check out the
<a href="https://github.com/teracyhq/angular-boilerplate/blob/master/README.md">README.md</a> file to follow.</p>

<h2>angular-hello-world</h2>

<p>In this section, I&rsquo;ll introduce you the best way to set up a development environment and you can apply
it for all your projects, not just Angular projects. After some first required steps to set up
<code>acme-dev</code>, after <code>$ vagrant up</code>, you can start coding immediately, you don&rsquo;t have to learn the set
up steps at first, but defer it later.</p>

<p>Suppose that we&rsquo;re in Acme organization and we need to work on the <code>angular-hello-world</code> project.</p>

<p>Let&rsquo;s follow the README file here: <a href="https://github.com/acme101/angular-hello-world">https://github.com/acme101/angular-hello-world</a></p>

<p>It tells us to follow <a href="https://github.com/acme101/dev-setup/blob/master/README.md">https://github.com/acme101/dev-setup/blob/master/README.md</a></p>

<p>By setting up <code>acme-dev</code>, we can use it for all types of projects with different stacks with the same
set up workflow, it means that we can save a lot of time and effort to add more and more projects.</p>

<p>Re-using and scaling boots productivity and cost savings.</p>

<h2>Best practices</h2>

<p>By looking into the <code>angular-boilerplate</code> or <code>angular-hello-world</code>, you can see the following best
practices:</p>

<ul>
<li><p>We should build the production Docker image for production deployment.</p></li>
<li><p>We should work on dev mode on local dev.</p></li>
<li><p>We should work on prod mode on local dev.</p></li>
<li><p>We should review others' work on local dev.</p></li>
<li><p>We should use alias domains instead of fixed ports to avoid conflicts.</p></li>
<li><p>We should generate <code>node_modules</code> to work on the npm packages safely within your IDE.</p></li>
<li><p>We should use <code>yarn</code> instead <code>npm</code> as the node package manager.</p></li>
<li><p>We should test both dev and prod modes on local dev.</p></li>
<li><p>We should test both http and https modes on local dev.</p></li>
</ul>


<p>All the instruction should be updated in the README file, please follow there to apply for your
project: <a href="https://github.com/acme101/angular-hello-world/blob/develop/README.md">https://github.com/acme101/angular-hello-world/blob/develop/README.md</a></p>

<h2>Summary</h2>

<p>All the heavy lifting and best practices are documented into the corresponding projects, that&rsquo;s how
we should do so that everyone can follow easily and we can support each other with ease, too.</p>

<p>Hopefully, this will help you a lot with your Angular projects and any other projects that you can
apply similarly.</p>

<p>Happy hacking and don&rsquo;t forget to let us know your feedbacks and questions by leaving your comments!</p>
]]></content>
  </entry>
  
  <entry>
    <title type="html"><![CDATA[Upcoming event: Productive development environment with teracy-dev]]></title>
    <link href="http://blog.teracy.com/2017/02/17/upcoming-event-productive-development-environment-with-teracy-dev/"/>
    <updated>2017-02-17T09:41:00+00:00</updated>
    <id>http://blog.teracy.com/2017/02/17/upcoming-event-productive-development-environment-with-teracy-dev</id>
    <content type="html"><![CDATA[<p><img class="center" src="/images/2017/02/17/opentour01-productive-development-environment-teracy-dev.jpg" title="Productive development environment with teracy-dev" ></p>

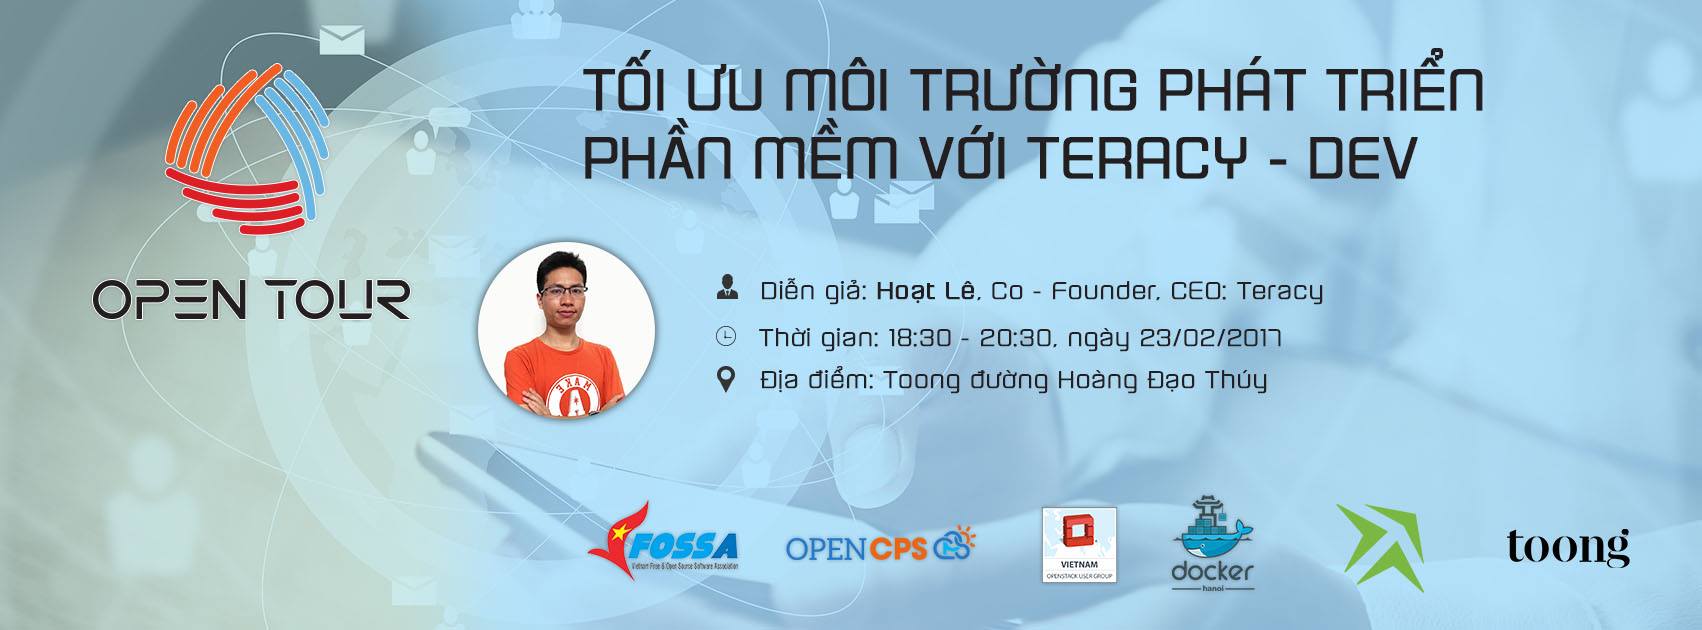
<p>We are very excited about an upcoming event with the topic &ldquo;Productive development environment with teracy-dev&rdquo;
presented by Hoat Le, Co-founder, and CEO of Teracy. The event will be held on Thursday, February
23 at 6:30 PM &ndash; 9:30 PM at Toong Hoang Dao Thuy (25T2 Hoang Dao Thuy, Ha Noi). This is
the first event in the series of OpenTour&rsquo;s activities.</p>

<p>OpenTour is started from the idea of ​​collaboration, and help each other of three open source communities in
Vietnam, including OpenCPS, Vietnam OpenStack, and Docker Hanoi. OpenTour is a series of activities
and events aiming at building Vietnamese FOSS ecosystem, building a network of FOSS experts to promote
the use, application and development of FOSS in Vietnam, especially for ​​ICT enterprises
and training institutions, on the base of absorbing ideas and activity patterns of the FOSS community
in the world, and through shared activities and promoting.</p>

<!-- more -->


<p><strong>Agenda</strong>:</p>

<ul>
<li><p>Introduce about OpenTour</p></li>
<li><p>teracy-dev: <a href="/2016/12/20/teracy-dev-the-only-truly-universal-productive-development-platform-with-docker-on-macos-linux-and-windows/">the only truly universal productive development platform with Docker on macOS, Linux, and Windows for developers</a>.</p>

<ul>
<li><p>Introduce about teracy-dev</p></li>
<li><p>The existing problems that many developers are struggling:</p>

<ul>
<li><p>The problems when there was no Docker yet</p></li>
<li><p>The problems when there was no teracy-dev yet</p></li>
<li><p>The approaches and solutions for these problems with teracy-dev</p></li>
<li><p>The 4-year story of teracy-dev</p></li>
<li><p>The Docker workflow with teracy-dev</p></li>
</ul>
</li>
<li><p>teracy-dev demo with the real projects</p></li>
<li><p>Questions and Answers</p></li>
</ul>
</li>
</ul>


<p>Join us! To have more details and register to join the event, please see the details at <a href="https://www.facebook.com/events/979555312146106/.">https://www.facebook.com/events/979555312146106/.</a>
It&rsquo;s our honor to have your presence at this event. See you there!</p>
]]></content>
  </entry>
  
</feed>